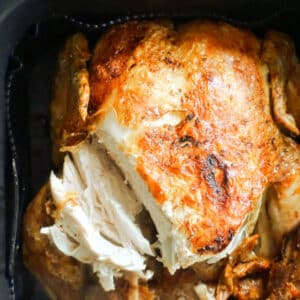
A super easy recipe for an air fryer whole chicken that is deliciously juicy and tender with golden crispy skin and a lovely hint of lemon. Minimal prep, and just over an hour in the air fryer, and you have a big 2kg chicken cooked easily to perfection.

As a family with 3 young kids, life can be pretty busy. But the one thing I would never compromise on is good food that is nutritious, delicious and always a feast for the eye. And my newly-found best buddy in the kitchen makes cooking so much easier and quicker.
I must say I was sceptical about purchasing an air fryer, since I have always been a huge fan of the oven, which allows me to cook big batches of food at the same time. A small air fryer simply wouldn't have done it for us.
Jump to:
What air fryer I use
So I decided to go for Tefal Dual Air Fryer, which comes with 2 different drawers, doesn't need preheating, and has a sync function which means you can have both drawers finish at the same time so you can enjoy all the food nice and hot. It has simply blown my mind off!
We all love a good Sunday roast, with chicken being everybody's favourite. And while you can bake it easily in the oven, it does take some time to be ready, depending on its weight.
My post How to Roast a Whole Chicken in the Oven explain in detail how to calculate the cooking time and oven temperature based on weight, but basically a big chicken like that one I used in the air fryer would have taken well over 2 hours to cook in the oven. In the air fryer it was ready in just over an hour!
The air fryer I used fits a large chicken easily in the main drawer, and you still have a smaller drawer free to use for veggies or any other side dish you like. How fantastic is that?!
It's simply the gift that keeps on giving. You don't need to use large amounts of oil, just a little amount for a good golden touch, and that's that. Plus, no more smoke and roasting kitchen after having the oven on for hours!
Note!
Go to the recipe card at the bottom of the post for exact quantities and detailed instructions!
Would you like to save this?
Ingredients overview

- whole chicken - the one I used weighted 2 kg or 4.4 pounds
- salt and pepper - a usually go for course salt and pepper for a nice touch, but used whichever you have around
- olive oil - or any other oil of your choice
- oregano - dried, use any other herbs if you wish
- paprika - for a touch of colour
- garlic - I kept the cloves whole
- lemon - I used a fork to pierce it and stuffed it whole in the cavity
Easy swaps
I went for a garlic lemon touch here, but you can literally make this roast as simple as can be by just seasoning it with salt and pepper and nothing else, you would still get a succulent chicken .
Other nice herbs that work here are rosemary, thyme, mixed Italian herbs or tarragon. You can also cut the lemon in half or wedges and have them around the chicken, rather than stuffed in the cavity.
Step-by-step photos and instructions
- in a ramekin, mix the oil olive with the salt, pepper, paprika and oregano
- brush the mixture all over the chicken
- transfer the chicken to the air fryer breast side up and cook at 180 degrees Celsius (350 Fahrenheit) for 25 minutes, flip the chicken onto the other side, and cook for a further 25 minutes
- flip the chicken breast side up again and increase the heat to 200 degrees Celsius (390 Fahrenheit) for 15 minutes so that the skin is golden and crispy

Expert tips
The chicken is ready when you cut into the thickest part of it and the juices run clear and there is no pink or red colour. This is the safest way to test without a thermometer.
If you use a smaller chicken, check for doneness after 50 minutes, it will cook a lot faster the smaller it is. Also, it cooks faster if the chicken is spatchcocked.
If you don't want to have to deal with flipping the chicken onto the other sides twice, you can start cooking it breast side down, and just flip it once after 25 minutes and follow the same instructions regarding the temperature.
Why the recipe works
- it cooks 40% faster than in an oven
- the meat is juicy and tender, while the skin is crispy and delicious
- no mess - especially if you use a silicone tray that fits perfectly into the air fryer drawer, this washes easily by hand or in the dish washer
- it's practical and easy to use
- you can cook a whole chicken in the air fryer without having to cut it into pieces

If you’ve liked this recipe or any other recipe on the blog then don’t forget to rate the recipe and let me know how you got on in the comments below, I love hearing from you! You can also FOLLOW ME on FACEBOOK, INSTAGRAM , YOUTUBE, TIK TOK , FLIPBOARD and PINTEREST to see more delicious food and what I’m getting up to.

Air Fryer Whole Chicken
Equipment
- 1 air fryer
- 1 silicone tray for the air fryer (optional)
Ingredients
- 1 whole chicken ( 2kg, 4.4 pounds)
- 1 tablespoon olive oil
- 1 teaspoon paprika
- ½ teaspoon coarse salt
- ¼ teaspoon ground black pepper
- 1 tsp dried oregano
- 3 cloves of garlic
- 1 lemon
Would you like to save this?
Instructions
- Use a ramekin to mix together the olive oil, salt, pepper, paprika and oregano.
- Brush the chicken well with the mixture.
- If you use a silicone tray, place the chicken onto it, if not, straight into the air fryer drawer.
- Use a fork to prick the lemon into a few places, then stuff the chicken cavity with the lemon and peeled garlic cloves.
- Cook at 180 degrees Celsius (350 Fahrenheit) for 25 minutes, then carefully flip the chicken onto the other side, and cook for a further 25 minutes.
- Flip the chicken breast side up again, increase the temperature to 200 degrees Celsius (390 Fahrenheit) for 15 minutes so that the skin is golden and crispy.
- Make an incision into the thickest part of the chicken, if the juices run clear, the chicken is done.
Video
Notes
- The chicken is ready when you cut into the thickest part of it and the juices run clear and there is no pink or red colour. This is the safest way to test without a thermometer.
- If you use a smaller chicken, check for doneness after 50 minutes, it will cook a lot faster the smaller it is. Also, it cooks faster if the chicken is spatchcocked.
- If you don't want to have to deal with flipping the chicken onto the other sides twice, you can start cooking it breast side down, and just flip it once after 25 minutes and follow the same instructions regarding the temperature.


DC says
Brillant recipe chicken very tasty and cooked beautifully. Always do my chicken this way and is always fully cooked
Daniela Apostol says
Fantastic! I am glad the recipe worked for you!